

Fun Recipes: Red Velvet Cake
Here’s a recipe for a red velvet cake by a website called The Cooking Foodie, with an Ermine icing recipe from a website called The Cookie Rookie. I baked this for my boyfriend’s birthday, and although the recipe was a bit daunting at first, it was much easier than I expected, and baking it was super fun! I had never made a cake from scratch by myself before, but even as a beginner I was able to create a gift I was proud of. He and his family loved it so much they asked me to teach him how to bake it. The cake turned out just as tasty the second time, and I can definitely recommend this recipe as it hasn’t failed me yet. If you want to try this recipe, I encourage you to do so regardless of how much experience you have, and remember, the company of a friend always makes baking more fun!
Cake Ingredients:
- 2 ½ cups of all purpose flour
- 2 tablespoons of cocoa powder
- 1 teaspoon of baking powder
- 1 teaspoon of salt
- 1 ⅓ cups of sugar ( you can increase the sugar to 1 ½ cups if you prefer it sweeter)
- 1 cup of buttermilk (room temperature)
- 1-1 ½ tablespoons of red food dye
- 1 cup of vegetable oil
- 2 eggs
- ½ cup of butter (room temperature)
- 1 teaspoon of white vinegar
- 2-3 teaspoons of vanilla extract
Icing Ingredients:
- 1 ½ cups of milk
- 6 tablespoons of flour
- 2 ¼ sticks of butter
- ¾ of a cup of Crisco shortening
- 1 ¼ cups of sugar (finely granulated if possible)
- 2-3 tablespoons of vanilla extract
- 4 tablespoons of powdered sugar
Note: Make some extra icing depending on how generously you decorate, if you have leftovers it will stay fresh in the fridge for a week. Can be made in advance.
Cake Directions:
- Preheat your oven to 350℉.
- In a mixing bowl, sift together flour, cocoa powder, baking soda, and salt.
- In a separate, larger bowl, beat together the butter and sugar until smooth. Then, add in your eggs one at a time. Add vegetable oil, vinegar, vanilla and buttermilk until combined. Gradually mix in the dry ingredients until the batter is well combined.
- Add 1-1 ½ tablespoons of red food coloring to the mix depending on your desired level of vibrancy in the cake.
- Grease two 8 inch pans with nonstick spray or butter and dust with flour. Then pour the batter into each pan, evenly dividing it between the two.
- Bake for 32- 35 minutes, or until a toothpick inserted into the center will come out clean.
- Allow cakes to cool completely before frosting and decorating.
Icing Directions:
- While the cake is cooling, begin making the icing. On a medium/low heat, whisk together flour and milk on a stovetop pan, stirring constantly to avoid forming lumps.
- If lumps have formed, pour through a mesh strainer into a container, using a rubber spatula to help push the milk mixture through.
- Refrigerate until cool, about 1-2 hours.
- After the mixture has fully cooled, begin to mix the icing in the following order:
- Beat the butter and crisco together in a stand mixer for 4 minutes on med/high speed.
- Add the sugar and beat for 4 minutes on the same speed.
- Add in vanilla and the flour and milk mixture, continuing to beat for 4 more minutes.
- Add your powdered sugar and beat for the last 4 minutes. After this last mixing, your icing will be airy and smooth, with no grainy bits of sugar, ready for decorating!
Decorating!
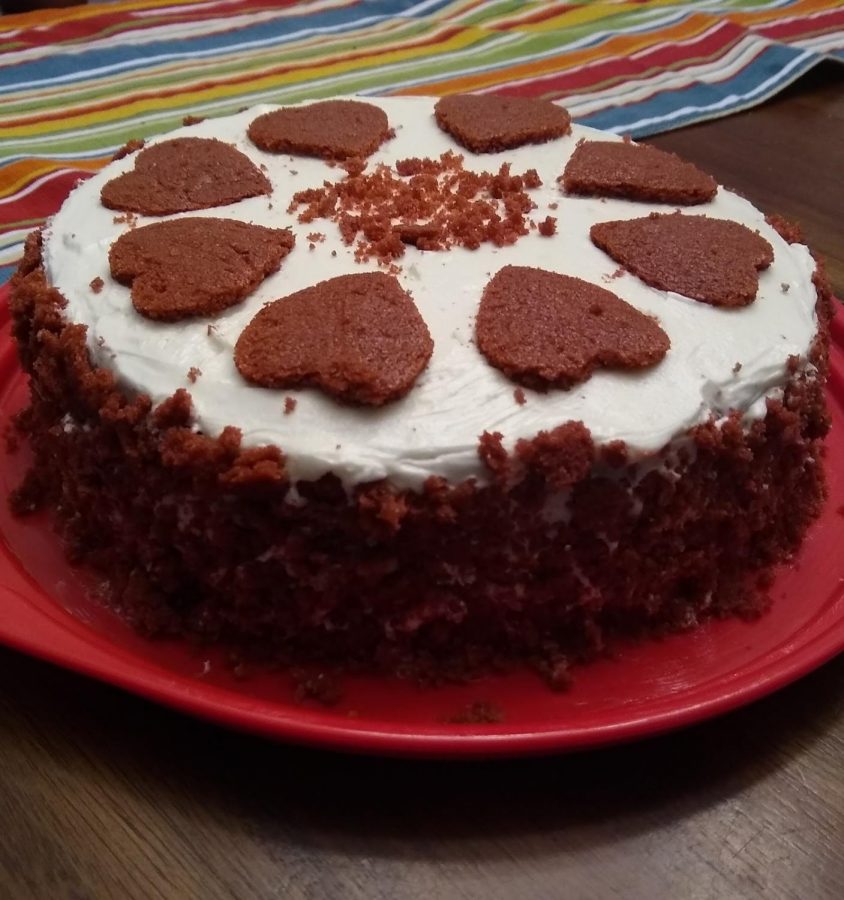
After the icing has been finished and the cake has been allowed to cool to room temperature to prevent the icing from melting, your dessert is ready for decorating! You can always just ice the cake as normal, however, here are instructions if you’d like to add a little extra pizzazz. Refer to the picture below if there’s any step you’re uncertain of.
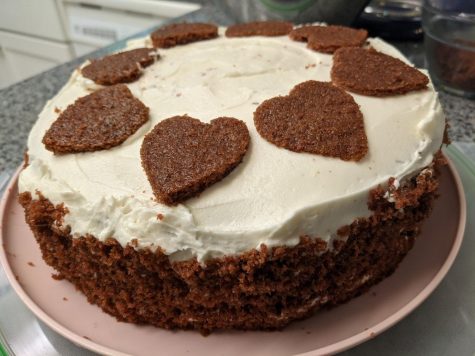
- The top of the cake will be slightly rounded in the center. Level the cake using a bread knife, and try your best to preserve the thin pieces of cake you have cut off the top without it crumbling too much.
- Using a shaped cookie cutter ( I used hearts, however, stars or flowers could be very cute as well) cut out 6-8 shapes into the thin tops you just leveled off.
- Crush the remainder of the thin top parts of the cake into crumbs, and set it aside for later.
- Place the first cake down and ice the top; once your desired amount of icing for the center has been reached, stack the second cake on top, then ice the whole thing. The top will be visible, so try to make the icing as smooth as possible, but the sides can be iced slightly messy as they will soon be covered.
- Once the cake has been iced, take your crumbs and push them against the side of the cake. Make sure the sides are as evenly coated as possible.
- Lastly, add your cut out cake hearts (or whatever shape you’ve chosen) on the top of the cake, arranging them equal distance from each other in a circle.


wendy wands • Nov 25, 2020 at 8:11 am
YUMMY, and wow how fancy! Great recipe!